You can use the Export-CSV cmdlet in PowerShell to export data arrays to CSV files. In this article, we will show you how to export data to a CSV file and how to add additional rows or columns.
The following command exports the list of Windows services to a CSV file:
Get-Service |select-object Name,DisplayName,Status | Export-CSV "C:\PS\services.CSV" -NoTypeInformation -Encoding UTF8
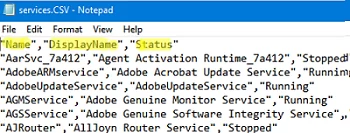
You can now open the CSV file you have received in any text editor. As you can see, the first row contains the column names (attributes of the PowerShell object) that we selected by using the Select-Object cmdlet, and then we can see the data line by line, separated by commas.
The comma is used as a separator (delimiter) in CSV by default. You can specify another CSV delimiter character (for example, semicolon, colon, etc.) with the –Delimiter option.
For example, let’s use a semicolon as a separator:
Get-Service | Export-CSV "C:\PS\services.CSV" -NoTypeInformation -Encoding UTF8 -Delimiter ";"
You can use the delimiter depending on your Windows regional settings. Use the -UseCulture parameter for this.
Get-Process | Export-Csv "c:\ps\process.csv" -UseCulture
(Get-Culture).TextInfo.ListSeparator
By default, the Export-CSV cmdlet creates a new CSV file (if the file already exists, it is overwritten/replaced by the new one). Use the -Append option, if you need to add new rows to the existing CSV file
For example, you want to schedule a PowerShell script that checks the free disk space and adds the current value to a CSV file:
$cur_time=get-date -Format u
 $freedisksize=Get-CimInstance -Class Win32_LogicalDisk |Where-Object {$_.DeviceID -eq "C:"} |select DeviceID,FreeSpace
Now you need to add the current date to the table (object) as one of the fields (attributes):
$freedisksize| add-member -membertype NoteProperty -name Date -value $cur_time
Export your PowerShell object to a CSV file:
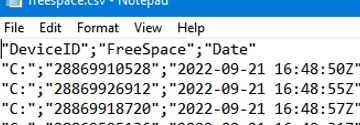
$freedisksize| Export-Csv -Path C:\ps\freespace.csv -Delimiter ";" -NoTypeInformation -Append
You can also use the following additional Export CSV options:
- -Encoding – allows to set CSV file encoding (utf8NOBOM is used by default). In most cases, I specify UTF8 here;
- -Force – allows overwriting the read-only file;
- -NoClobber – if the file already exists, do not overwrite it;
- -Header – add a header to the CSV file (if it is missing);
- -IncludeTypeInformation/-NoTypeInformation – add or skip the #TYPE line with object type data to the file header (for example,
#TYPE System.Diagnostics.Processor#TYPE System.Service.ServiceController). In PowerShell 6+, the header TYPE information is not displayed by default; - -UseQuotes (introduces in PowerShell Core 7.x) – whether to quote values or not (AsNeeded/ Always (default)/Never)
You can then process the CSV file you receive in Excel or other programs.
The Export-CSV cmdlet is often used to create various tabular exports and reports. Below are some examples of useful system administrator reports that can be generated using the Export-CSV command:
- Exporting a list of computers in AD using the Get-ADComputer cmdlet;
- Extract user information from Active Directory using the Get-ADUser;
- Find out inactive users or computers in an AD domain
- Getting user sign-in logs from the Azure AD;
- Export RDP connections history (logs);
- Script to check the Windows activation status on computers in a domain.
Import-CSV cmdlet to read (import) data from a CSV file into PowerShell.
