In this article, we’ll look at how to manage calendar permissions in on-premises Exchange Server and Microsoft 365 mailboxes using Outlook and PowerShell. We will also focus on the topic of viewing availability (free/busy info) in calendars of rooms or shared mailboxes.
Quite often, an Exchange administrator needs to grant someone access to another employee’s calendar. For example, a secretary wants to create, remove, and edit any items in the director’s calendar and meeting room mailbox; or a department head wants to see and edit employee availability in their calendars.
How to Share a Calendar in Outlook and Outlook Web App?
A user can grant access to their calendar directly from Outlook. The Exchange Calendar is essentially a common folder in a user’s inbox. You can configure calendar access on the desktop version of Outlook or through Outlook Web Access (Outlook on the web).
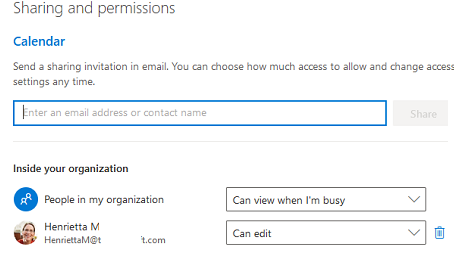
Select a calendar and click Sharing and permissions in its properties.
In the next window, the current list of users and groups having access to your calendar appears. In our example, any user of your organization (tenant) may view the Free/Busy information in the calendar ( Can view when I'm busy ). User Henrietta has permissions to create and edit any items in the calendar.
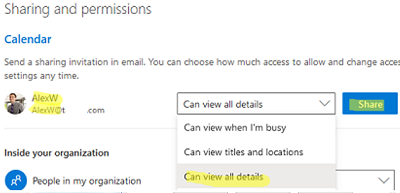
A user can send an invitation to share their calendar with another user. Just enter a user email and select the access permission. In this example, I’m granting Alex permission to view events on my calendar (Can view all details).
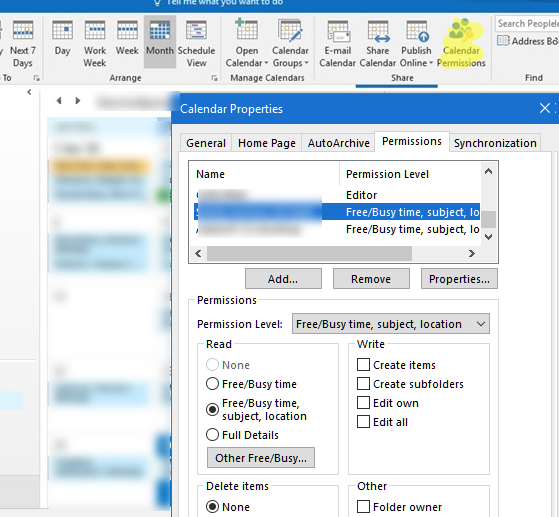
In desktop Outlook versions, calendar permissions are assigned in a similar way. Open your Outlook, select your Calendar, and click Calendar Permissions. In the next window, you will see who can access your calendar. Using the Add/Remove buttons, you can grant and revoke access permissions.
Assigning Calendar Permissions in Exchange/Microsoft 365 Mailbox Using PowerShell
An organization/tenant administrator can grant access to any user calendar or a shared mailbox using PowerShell or Microsoft Graph API (for Microsoft 365/Azure). Only with PowerShell can you quickly grant access to all user calendars in the organization.
Open the PowerShell console and connect to your on-premises Exchange Server or Microsoft 365 (Exchange Online) tenant:
- Using PowerShell you can remotely connect to an on-premises Exchange Server from any computer, even without the EMS (Exchange Management Shell) module installed:
$ExchAdmCred = Get-Credential
 $Session = New-PSSession -ConfigurationName Microsoft.Exchange -ConnectionUri http://mun-mx1.woshub.com/PowerShell/ -Authentication Kerberos -Credential $ExchAdmCred
Import-PSSession $Session - To connect to an Exchange Online (Microsoft 365) tenant with the multi-factor authentication (MFA) enabled, use the Exchange Online PowerShell module. It also supports connection using Modern Authentication:
Connect-ExchangeOnline -UserPrincipalName [email protected]
You can list current user calendar permissions using the command below:
Get-MailboxFolderPermission -Identity maxbak:\Calendar
maxbak:\Kalender.The User column shows users, and the AccessRights column displays access privileges. Exchange has several predefined roles that you can use to set folder and calendar permissions (roles with the lowest privileges come first):
- None
- AvailabilityOnly
- Contributor
- Reviewer
- NonEditingAuthor
- Author
- PublishingAuthor
- Editor
- PublishingEditor
- Owner
To grant another user access to a mailbox folder, use the Add-MailboxFolderPermission cmdlet. For example, to allow user A.Weber to edit the calendar items of S.Fischer, run the command:
Add-MailboxFolderPermission -Identity S.Fischer:\Calendar -User A.Weber -AccessRights Editor
If you want to grant view-only permissions:
Add-MailboxFolderPermission -Identity S.Fischer:\Calendar -User A.Weber -AccessRights Reviewer
To remove calendar permissions:
Remove-MailboxFolderPermission -Identity S.Fischer:\Calendar –user A.Weber
You can export current calendar permissions for all mailboxes in your Azure tenant (Exchange organization) to a CSV file:
$Mailboxes = Get-Mailbox -ResultSize Unlimited | Select-Object UserPrincipalName
 foreach ($mailbox in $Mailboxes) {
 Get-MailboxFolderPermission -Identity "$($mailbox.UserPrincipalName):\Calendar" |
 Select-Object @{Name="UrerPrincipalName";E={$mailbox.UserPrincipalName}},FolderName,User,AccessRights |
 Export-Csv C:\PS\Calendar_report.csv -NoTypeInformation -Append
 }
Later you can analyze the CSV file with mailbox UPNs and calendar permissions in Excel.
The following PowerShell script will allow a specific user to view all calendars in your organization:
Foreach ($Mailbox in (Get-Mailbox -ResultSize Unlimited)) { Add-MailboxFolderPermission -identity "$($Mailbox.Name):\Calendar" -AccessRights Owner -User A.Weber}
How to Show Full Free/Busy Info in Exchange/Microsoft 365 Calendar?
Users in the same organization can view the availability information of other users or resource mailboxes. By default, only Free/Busy information is available.
Subjects, descriptions, and locations are not visible on other users’ calendars. The Default= AvailabilityOnly permission causes this behavior. The AvailabilityOnly permission type allows viewing the availability information (Free/Busy) only.
You may want users to view both the availability and subjects or locations in a calendar (for example, a shared resource calendar). The following command allows all users to view events in the calendars of all room mailboxes:
Foreach ($Mailbox in (Get-Mailbox -ResultSize Unlimited) | Where {$_.ResourceType -eq "Room") { Add-MailboxFolderPermission -identity "$($Mailbox.Name):\Calendar" -AccessRights AvailabilityOnly -User Default }
By default, the owner’s name is shown instead of the meeting title. This behavior is set by the AddOrganizerToSubject = $true attribute. To allow viewing subjects and their contents in a room calendar, use the command below:
Set-CalendarProcessing room123 -DeleteComments $false -DeleteSubject $false -AddOrganizerToSubject $false
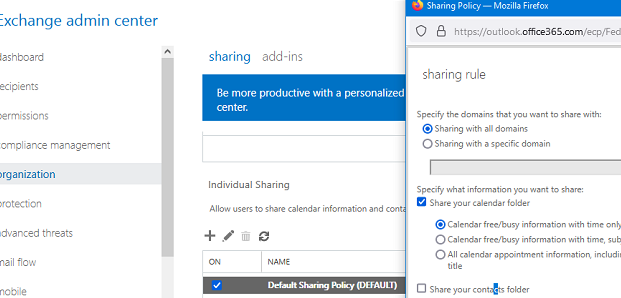
In Exchange Online, you can configure whether users are allowed to publish their calendars for external users (organizations). Open the Exchange Admin Center and navigate to Organization -> Sharing.
By default, the Default Sharing Policy is used that allows to share only Free/Busy information with external users. Here you can set a list of email domains you can share calendars with and/or edit a set of calendar information to be shared (subjects, location, organizer).




2 comments
You can grant calendar permissions only to m365 unified group or mail-enable security groups.
Send invitation: -SendNotificationToUser $true
Make a user delegate: -SharingPermissionFlags Delegate,CanViewPrivateItems